To Create SharePoint 2013 User Profile Service, you need to have below prerequisites
- Configure Manage Meta Data Service
- Configure Search Service
- Business Data Connectivity Service (Optional)
- Farm account should be member of Local Administrators Group when Synchronization is start for first time.
- Service Account Should have Permission “Replicating Directory Changes” in Active Directory
Navigate to Active Directory Users and Computers
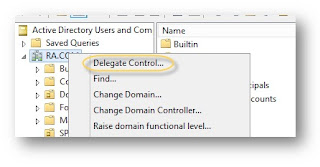
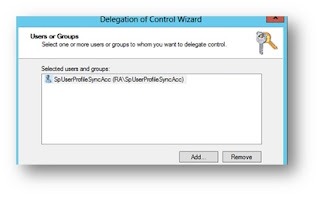
Add Service User Account
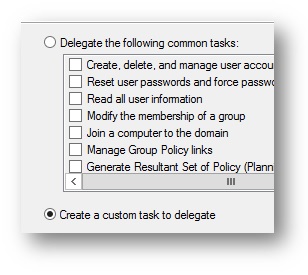
Click next and Select “Custom Task to Delegate” Option button
Click Next and again next.
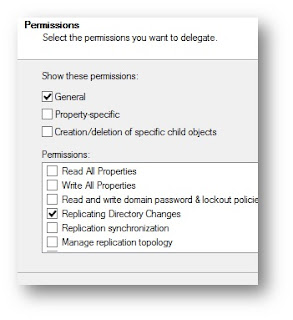
In Permissions Page, Select “Replicating Directory Changes” Option in the list
Finish the wizard.
1. Replicating permission in AD. For this follow the below steps.
- Log on to AD Server as the domain administrator.
- Start Active Directory Users And Computers and enable Advance Features.
- Open the Properties for the domain and click the Security tab.
- Add the upc/upc.spuserprofilesyncacc to the list.
- Assign the following permissions to the upc/upc.spuserprofilesyncacc account:
- Replicating Directory Changes
- Replicating Directory Changes All
- Replicating Directory Changes In Filtered Set
Replication synchronization.
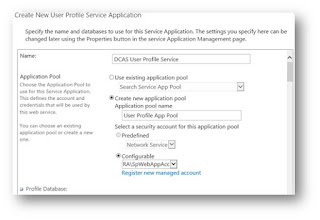
Configure User Profile Service
- Manage Service Applications within Application Management.
- In the Create group on the ribbon, from the new menu, select User Profile Service Application.
- Assign a name to the new UPA.
- In the Application Pool section, either select an existing application pool (one already created for services) or build a new application pool. Specify a managed account that should run this application pool (most often, this account runs all the service applications unless your security policy forbids it).
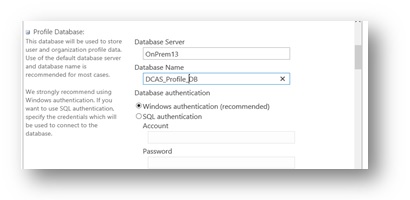
- Type the configuration values for the Profile, Synchronization, and Social Tagging databases, using the following choices: A. Select an appropriate database name, following the conventions of your environment.
- For the authentication section, select Windows Authentication (recommended).
- If you are using mirroring, specify the name of your failover server
- Type the My Site host address and My Site Manage Path information.
- You may not have this information yet. It’s covered shortly and can be added in to the configuration after the UPA is created.
- In the site naming section, choose a naming format that is best suited to your environment
- Specify whether you want to associate the UPA with the default proxy group.
Start Service
- Enable Fim Services ( by default they are disabled)

- Navigate to Services on the Farm Server
- System Settings -> Services on the Server -> Start following Services

- For the first time when you start the Synchronization service, make sure Farm administrator is a member of Local Administrators group
- Better if u can restart the server once you start the User Profile Synchronization Service
Create Active Directory Connection
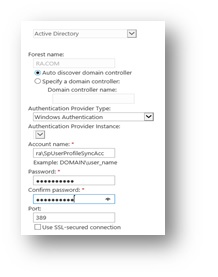
You need to use same account which you gave “Replicating Directory Changes” in previous step